Are you looking for a reliable Xentry Diagnostics Openshell download that offers full activation and the latest features? At VCertech, we’re excited to present the Xentry Openshell 06.2024 Software – a powerful tool designed for seamless vehicle diagnostics and repairs. In this post, we’ll walk you through the complete installation process, share vital system requirements, and provide troubleshooting tips to ensure a smooth setup of your Xentry Diagnostics Openshell solution.
System Requirements to Download Xentry Openshell
Before diving into the installation process, it’s crucial to verify that your computer meets the following system configuration to avoid any installation errors:
- Operating System: Windows 10 64-bit
- Storage:
- 23GB available for files
- 110GB available for installation
- Processor: Intel Core i5 (3rd generation) with a minimum frequency of 2.3 GHz
- RAM: 8GB or more
- Required Feature: .NET Framework 4.8
Meeting these requirements ensures that the Xentry Openshell XDOS and related components perform optimally on your system.
Step-by-Step Xentry Openshell Installation Process
Follow these steps carefully to install the Xentry Openshell Software without any hiccups:
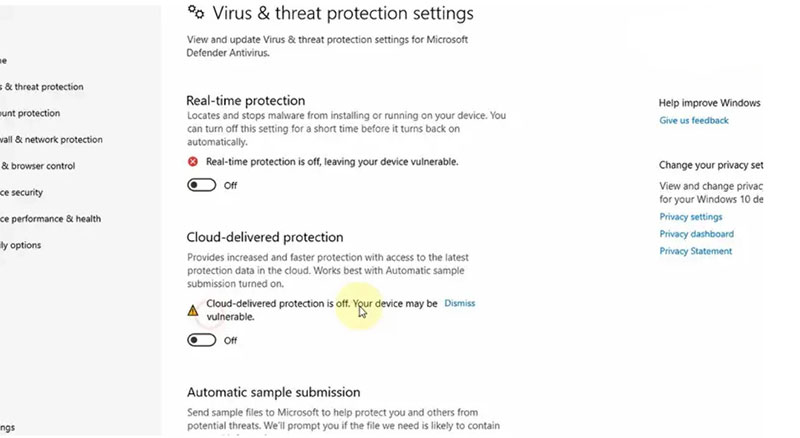
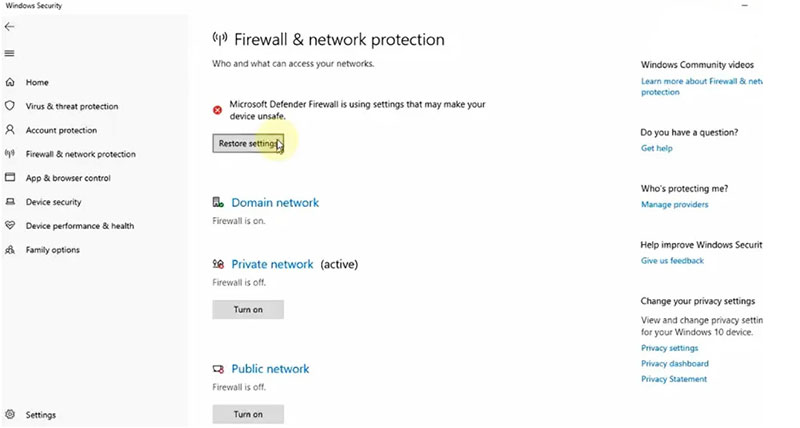
1. Disable Your Antivirus and Firewall
To prevent interruptions during installation, temporarily disable your antivirus and firewall:
- Open the search bar and type “Windows Security.”
- Select “Virus & threat protection.”
- Click on “Manage settings.”
- Toggle the switch under “Real-time protection” to turn it off.
- Confirm any prompts that may appear.
Disabling these security features helps avoid potential conflicts that could block the installation of the Xentry Openshell software.
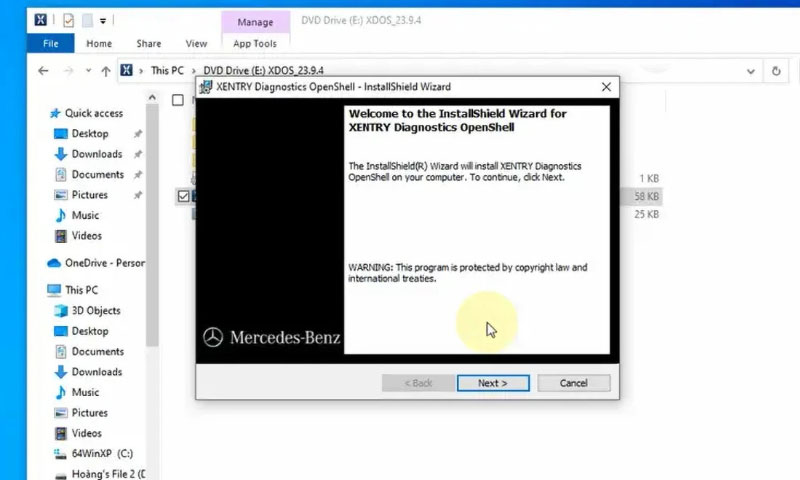
2. Run the Xentry Openshell Software from the Designated Folder
Before initiating the installation:
- Ensure that VCRedist x86 x64 is enabled.
- Navigate to the folder containing the Xentry Openshell software.
- Click on “XDOS” and select “Mount” to start the installation process.
Allow the installation to run uninterrupted—it may take several hours to complete. Remember to:
- Run all applications as an administrator.
- Choose your preferred language during the setup.
- Verify that you have sufficient free disk space.
- Confirm that .NET Framework 4.8 is installed.
- Consider enabling the Microsoft Message Queuing Server (MSMQ) feature if required by your Windows version.
This step-by-step approach ensures that the core components of your Xentry Openshell Download are correctly installed.
3. Reboot Your Computer
Once the installation process is complete, the system will prompt you to reboot. Restarting your computer is essential to finalize the installation and integrate all necessary components.
4. Recheck Antivirus Settings
After rebooting, verify if your antivirus has automatically re-enabled itself. If it has, disable it again temporarily to avoid any interference with subsequent setup steps.
5. Disable Background PDFs
To prevent Xentry’s PDFs from running in the background, access the Task Manager:
- Right-click on the Windows toolbar.
- Identify and disable any processes related to Xentry PDFs.
This ensures that your system resources are optimized for the Xentry Diagnostics Openshell application.
6. Crack the Xentry Diagnostics Openshell Software and Insert the Missing File
For those needing to bypass certain restrictions:
- Navigate to the CLO drive.
- Follow the specific instructions provided to insert the missing file.
=>If you require assistance, click here to contact VCertech and get Xentry Openshell & License.
7. Activate the Software
Activate your Xentry Openshell software using the provided ID to obtain your Activation Key. This step is crucial for unlocking the full capabilities of the software.

8. Secure Your Activation Key
Store the Activation Key in a secure location for future reference. This key is essential for verifying your software’s authenticity and ensuring uninterrupted service.
9. Modify the LAN ID
Adjust the LAN ID settings as necessary to match your network configuration. Proper LAN ID configuration is critical for the software’s communication and diagnostic functions.
10. Verify and Utilize the Software
Finally, run the software to confirm that all components are working correctly. Test the diagnostic features and ensure that the Xentry Openshell XDOS integration is seamless.
Reason for Xentry Openshell Installation Failure
Even with careful adherence to installation instructions, you might encounter some common issues:
- Incorrect Activation Key: Double-check the key provided to ensure there are no errors. An incorrect key will halt activation.
- Antivirus/Firewall Interference: Make sure these are disabled during installation. Re-enable them only after the installation is complete and the software is activated.
- Insufficient Disk Space: Verify that your system meets the storage requirements mentioned above.
- Previous Installation Conflict: Ensure that any previous versions of Xentry have been properly uninstalled before attempting a new installation.
If issues persist, consider contacting VCERTECH for professional assistance. Their support team can help troubleshoot and resolve problems efficiently, saving you both time and potential costs.
Ready to Get Started? Contact VCertech Today!
If you’re ready to experience the full power of Xentry Openshell 09.2024 Software, don’t hesitate to reach out to us at VCertech. Contact VCertech via Whatsapp number +1 (641) 206-8880 for your Xentry Openshell xdos software download file, Xentry license key, and 24/7 installation support. Our dedicated team is available around the clock to provide expert assistance and ensure you have everything you need for a successful installation.
Not only do we help you download and activate your software, but we can also assist in fixing your car using this powerful diagnostic tool. Whether you’re a professional mechanic or a car enthusiast, our comprehensive support and expert guidance will help you make the most of your vehicle repair experience.
Contact us now and let us help you drive your automotive repair process forward with confidence!